
I’m a traditional quilter who fell in love with a quilt pattern that spoke to me from my social media feed. I was shocked to discover it is pieced with foundational paper piecing (FPP). Before I began to learn FPP, I wish someone had told me these important differences!
My first introduction to FPP was once 20 years ago when I purchased some stamped muslin FPP blocks that produced 4″ finished blocks at a quilt show vendor booth. The designs were complicated and should NOT have been my first attempt at learning a new technique. Some of the fabric pieces were smaller than the scraps I swept up off my sewing room floor. Needless to say, they are a project that still sits in my Projects-Half-Done pile.
Thanks to social media, a new pattern popped up in my social media feed and I had to have it. Notes To Self is perfect for me! With 35 years of a desk job under my belt and an extreme love of office supplies, Notes To Self-called to me in so many ways. I purchased it before I realized it was not traditional piecing. I may have not cared how it was made. I just need to make it…..you understand, right?

I soon found that FPP broke many traditional quilt-piecing rules that I hold dear. Since this rocked my world so much, I wish I had been warned before I started this entire project. I thought I would share these revelations so you will be warned going in that foundation paper piecing is different from other piecing techniques in quilting.
1. Foundation paper piecing is not like traditional patchwork piecing.
First, abandon your traditional piecing principles. Open yourself up to a new method of sewing fabrics together to make beautiful blocks. Don’t go at it like I did, thinking I knew all there was to know about sewing two fabric shapes together.
I consider myself an advanced seamstress so “I got this!” kept echoing through my head. Boy, was I wrong! I had to get out the written instructions which were very detailed, by the way. and open my mind. This took a completely new and different way to sew fabric together.
2. Reverse your mindset.
Yes, mindset is key! As seamstresses, we use both the right side and the wrong side of the fabrics. Quilters sew the wrong sides of fabric pieces together to create a design on the right side. We need to do that with foundation paper piecing but we are sewing those fabrics wrong sides together but on the wrong side of a foundation, often a piece of paper. We stitch along the lines of the printed pattern but the fabric is on the unprinted side of the pattern. In many ways, you sew guessing and hoping your fabric is lined up correctly.
So your brain needs to think about the block backward and blind.
I do not recommend trying FPP while distracted. I worked on this quilt during a time of life drama and I made a mess! I could not, for the life of me, visualize the blocks. If you look closely at my blocks, you will see there are a few that are wrong. Anyone experienced with using sticky notes can see that notes don’t fold like I have them. I should have used my seam ripper and taken them apart but after my second rip and re-sew, I discovered another important tip about FPP.
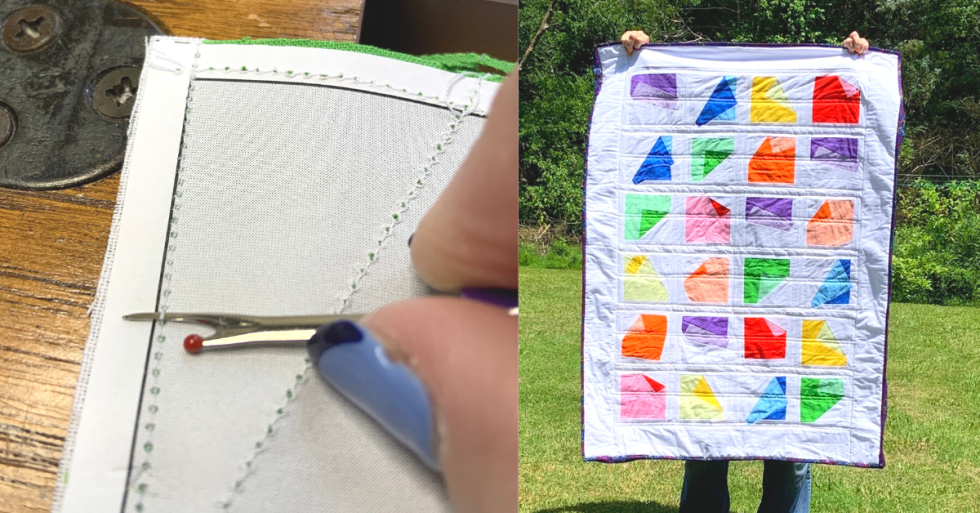
3. Foundation paper piecing seams are stitched with a 1.5 – 2mm stitch length.
This is an incredibly short stitch. I piece quilts with a 2-3mm length stitch. The instructions recommend a 1.5mm machine stitch so, tightly holding on to the foundation. I made my first seam. Then, I made another and completely sewed the wrong piece to the wrong seam.

Grabbing my trusty ripper, I started to pick out the stitches. I quickly found out that a 1.5mm stitch is narrower than the blade on my seam ripper. It was a challenge to rip those stitches. Since the seam is also stitched to the paper, the stitches weaken the paper foundation and cause the perforated in you just created to tear completely out. Soon, I had little perforated giblets scattered all over my sewing machine. I only ripped 2 incorrect lines of stitching before I adopted the “toss it, start over” plan. I learned the limit of my patience with teeny, tiny tedious work.
4. Bright lighting is necessary at your workspace.
While leaning over with my eyes squinting, it became very clear my sewing room lighting needed to be brighter. I have good lighting on my machine. I use an old Ott light over my machine that usually does the job. I never move it but this foundation paper piecing project required me to pull it down closer to the tabletop. I will never attempt this type of project again without great lighting.
5. Proper tools are essential.
Another tip related to your lighting and sewing space has to do with tools. Scissors, to be specific. We all have our fabric scissors, prized and protected and always sharp, and we have tried to train all our family members to never use them on anything but fabric. To do foundation paper piecing, we must learn to practice what we preach! The easiest thing was to bring a second pair of scissors designated to cut paper into my sewing workspace. You will want both fabric scissors and paper scissors to use. Now, being able to tell them apart when you grab for them may be a challenge but I’m sure you can come up with something. I may need to admit that I accidentally grabbed the wrong pair more than once.
6. Foundational paper piecing is sewing to paper.
And finally, a few words about the paper foundation. There are several great tips out there about types of paper and even muslin to use for the foundation papers but one thing that I have never seen anyone draw attention to is the lines printed on those foundations.
I learned to sew with tissue paper patterns from the Big 4 pattern companies. I’ve since moved on to a combination of those original tissue patterns and indy designers downloaded pdf patterns. Through both formats, one thing has always held true across all print patterns – Solid lines equal cutting lines, and dashed lines equal stitching. Simply, cut on the solid and stitch on the dashed. So, I did what I was accustomed to doing and ruined my first FPP block.

In FPP, the lines are exactly opposite. Stitching is always done along solid lines. Every. Single. Time. No expectations unless the designer of the pattern has noted a difference. I have to say cutting on the solid line is so ingrained in me that I messed up more blocks than I am willing to admit. Always check the design and identify the correct lines.
7. Fabric grain is irrelevent.
One last tip that I’m hoping to unlearn was fabric grain. In all sewing, fabric grain is essential. Identifying the grain, cutting with or against the grain correctly, and sewing with the proper grain have always been learned skills that lead to a correct finished product. My quilt pattern never mentioned grain in the instructions Grain is seldom mentioned in other FPP patterns I have looked at. As far as I can tell, one should abandon any notice of the fabric’s grain when cutting the fabric for the blocks. This realization hit me hard!
I can’t complain too much, my resulting quilt was amazing. It taught me so many lessons that I needed to learn at the time.
